Basement
Full basement & Daylight basement
Types of Basements
Full Basements
Description: Full basements are extensive subterranean spaces that span the entire footprint of a house, characterized by sufficient ceiling clearance—usually 7 feet or more—to comfortably stand and move around. These areas are versatile and can serve multiple purposes, ranging from additional living quarters, recreational spaces, to storage and utility areas. The construction of full basements involves significant excavation, ensuring the depth is adequate for the intended use. They are often integrated into the home’s central heating and cooling systems, making them easily adaptable for finishing if they are not already done so.
How to Identify:
-
Staircase Access: The most evident sign of a full basement is an interior staircase leading downwards from the main level. This access point is usually centrally located within the house, providing easy transition between the basement and other living spaces.
-
Window Placement: Unlike crawl spaces or slab foundations, full basements typically feature windows that are partially above ground level. These windows are often small and placed near the ceiling of the basement, offering natural light and ventilation, a key feature distinguishing them from lower ceilings or entirely subterranean basements.
-
Exterior Indicators: From the outside, you may notice window wells or slightly elevated windows along the foundation, indicating the presence of a full basement below. These windows are essential for emergency egress and to provide natural light.
-
Finished vs. Unfinished Spaces: Full basements may be fully finished, with drywall, flooring, and ceilings comparable to the main living areas, including bedrooms, bathrooms, and entertainment spaces. Unfinished basements, on the other hand, are more utilitarian, housing HVAC systems, electrical wiring, plumbing, and offering ample storage space. The presence of such installations or finishing touches can provide clues to the basement’s extent and use.
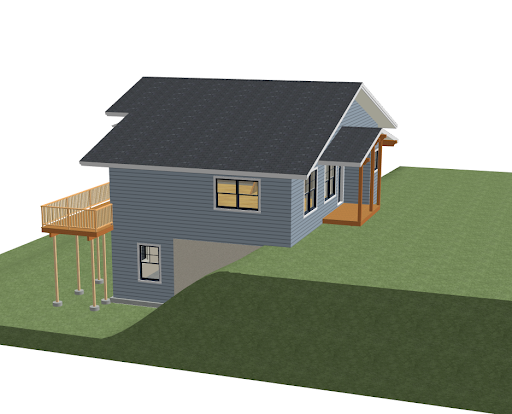
Daylight Basements
Description: Daylight basements, also known as walk-out basements, are designed to take advantage of a sloping lot by having one or more sides partially or fully above ground, allowing for ample natural light and direct exterior access. This configuration makes them particularly appealing for use as living spaces, home offices, or recreational areas. The portion of the basement that is above ground is typically equipped with larger windows or glass doors, which not only bring in natural light but also provide views of the surrounding landscape. The versatility and functionality of daylight basements add significant value to a home, offering the potential for a seamless blend between indoor and outdoor living.
How to Identify:
-
Sloping Lot: The most distinctive feature of a property with a daylight basement is its location on a sloped or hillside lot. This natural terrain allows one side of the basement to be exposed to the outside, distinguishing it from a full basement, which is entirely below ground level.
-
Windows and Doors: Look for large windows and glass doors on the exposed side of the basement. These are not only sources of natural light but also provide exits to the backyard, garden, or side yard. The size and placement of these windows are often similar to those found in the main living areas of the home, contributing to the basement’s functionality as a comfortable living space.
-
Exterior Access: A key indicator of a daylight basement is direct access to the outside, which may include sliding glass doors, French doors, or a separate entryway leading to the backyard or side yard. This feature enhances the basement’s appeal by offering private access and the potential for indoor-outdoor flow.
-
Interior Layout and Design: Inside, daylight basements may be finished to the same standards as the home’s primary living areas, with bedrooms, bathrooms, and common areas that take advantage of the natural light and views. The presence of such spaces is a clear sign of a daylight basement.
-
Grade Changes: Observing the home from the outside, you may notice a distinct change in grade around the building’s perimeter. One side of the home will appear to have a standard foundation, while the opposite side, where the land slopes away, will reveal the basement level and its larger windows or doors.
-
Landscaping and Outdoor Features: Properties with daylight basements often feature landscaping, decks, patios, or terraces that integrate with the basement’s exterior access, enhancing outdoor living and entertainment possibilities.
Lookout & cellar basement

Description: Lookout basements are a unique type of basement that combines the benefits of underground insulation with the aesthetic and practical advantages of natural light and views. They are constructed to be mostly below ground level, yet feature significantly larger windows than those found in traditional full basements. These windows are installed high on the basement walls, allowing occupants to “look out” over the ground level. This architectural design not only brings in more natural light but also provides an elevated view of the surroundings, making the space feel less like a traditional basement and more like a lower level of living space. Lookout basements are an excellent option for homeowners who want the functional benefits of a basement without sacrificing light and connectivity to the outdoor environment.
How to Identify:
-
Elevated Windows: The most distinctive feature of lookout basements is their elevated windows. Unlike the small, ground-level windows of a full basement, lookout basement windows are larger and set higher on the wall, often at or just below the ceiling of the basement. This positioning allows for more substantial natural light penetration and views of the exterior.
-
Partial Submersion: From the outside, a lookout basement can be identified by observing how the house sits in relation to the ground. Lookout basements are partially submerged, with the foundation walls extending above the ground more than in a typical basement. This construction supports the installation of higher windows.
-
Interior Access and Layout: Like full basements, lookout basements are accessed from the interior of the house, typically via a staircase. The interior layout may include living spaces, bedrooms, or recreational areas, all benefiting from the enhanced natural light and views provided by the elevated windows.
-
Exterior Appearance: On the exterior, lookout basements may have a distinct appearance due to the visible portion of the foundation walls. The elevated windows may be accompanied by window wells, though these wells are generally shallower and less pronounced than those required for lower basement windows.
-
Natural Light and Views: The presence of natural light and views of the landscape from within the basement is a key indicator of a lookout design. The windows are positioned to offer a view out, which is not typically possible with standard basement windows that align closely with the ground level.
-
Ventilation and Egress: Lookout basements often feature better ventilation options due to the larger window size. These windows can also serve as egress points in case of emergency, providing an added safety benefit.
Cellar
Description: A cellar is a type of basement that is traditionally used for the storage of perishable goods, wine, and other items that benefit from the cool, stable temperatures typically found below ground level. Unlike full or daylight basements designed for living space, cellars are utilitarian in nature, focusing on functionality rather than comfort. They are a common feature in older homes and may possess characteristics such as dirt or concrete floors, stone or brick walls, and robust shelving for storage. The environment in a cellar is often cool and damp, ideal for the storage of wine, canned goods, and sometimes even root vegetables. Additionally, cellars may house utilities like furnaces, boilers, or water heaters, especially in homes where other basement types are not present.
How to Identify:
-
Entry Points: Cellars can be accessed either externally via a bulkhead door or internally through a trap door or a narrow staircase. These entry points are often less conspicuous than those leading to full basements and may be located in less trafficked areas of the home.
-
Construction Materials: The construction of a cellar is typically very basic, with stone or brick walls that are sometimes left exposed. Floors may be made of dirt, gravel, or concrete, emphasizing the cellar’s utilitarian purpose over aesthetic or living comfort.
-
Limited Space and Lower Ceiling Heights: Cellars are generally smaller and have lower ceilings compared to other types of basements. This characteristic, combined with exposed pipes or beams, contributes to the space’s rustic or unfinished appearance.
-
Storage Usage: The presence of shelving units, wine racks, or storage containers for food and other perishables is a clear indicator of a cellar. These spaces are optimized for storage rather than habitation, with conditions that may include higher humidity and cooler temperatures.
-
Environmental Conditions: Cellars often have minimal ventilation and natural light, creating a consistently cool and damp environment that is ideal for the storage of certain goods. The lack of windows and insulation against outdoor temperatures helps maintain these stable conditions.
-
Utility Equipment: It’s common to find heating and plumbing equipment within cellars, especially in older homes where such utilities were not integrated into the main living spaces. The presence of a furnace, boiler, or water heater in a small, unfinished space is a strong indicator of a cellar.
Inspection Tips for Basements
1. Signs of Water Damage
-
-
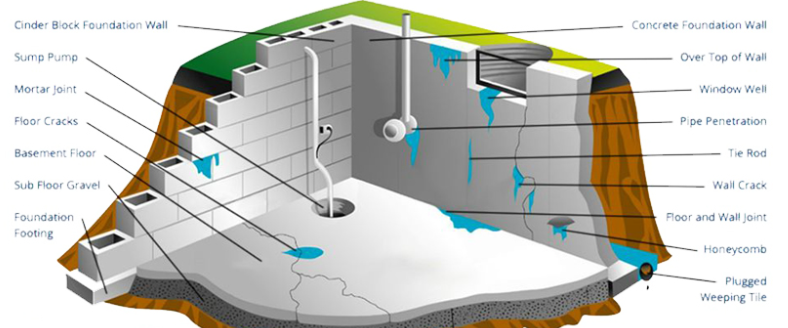
Water Stains: Look for discoloration on walls, ceilings, and floors. Water stains can range from yellow to brown and indicate past or present water intrusion.
-
Peeling Paint or Wallpaper: Water infiltration behind paint or wallpaper can cause it to peel, blister, or bubble.
-
Efflorescence: This white, powdery substance forms on concrete or masonry surfaces when water evaporates, leaving behind salt deposits. Its presence suggests water has passed through the material.
Mold and Mildew
-
Visible Mold: Look for spots or patches of mold, which can appear in various colors (black, white, green, or yellow) on walls, ceilings, and other surfaces.
-
Mildew: Often seen as a powdery or fluffy white substance, mildew thrives in moist environments and can be found on both organic and inorganic materials.
-
Odors: A musty, earthy smell is a strong indicator of mold or mildew presence, even if it’s not immediately visible. This odor can help identify hidden moisture problems behind walls or under floors.
Cracks and Gaps
-
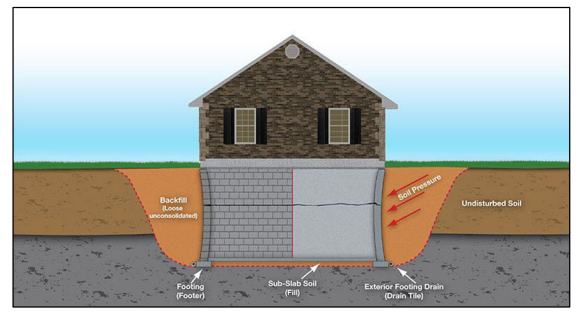
Foundation Cracks: Inspect the interior and exterior of foundation walls for cracks. Horizontal cracks can indicate pressure from soil outside, while vertical cracks might result from settling. Diagonal cracks can be a sign of both.
-
Floor Cracks: Check concrete slab floors for cracks. While some small cracks are normal, widening cracks can indicate water issues or structural movement.
-
Gaps Around Pipes: Examine where pipes penetrate walls or floors for any gaps that might allow water to seep into the basement. Sealing these gaps can prevent water entry.
Addressing Moisture Issues
-
Dehumidification: In basements with high humidity levels but no visible water intrusion, a dehumidifier can help maintain a dry environment.
-
Sealing Cracks: Small cracks in the foundation or floor can often be sealed with epoxy injections or other suitable sealants. Larger, structural cracks may require professional assessment and repair.
-
Waterproofing: Various waterproofing methods, from interior water barriers to exterior foundation waterproofing, can address chronic water intrusion issues.
Assess Structural Integrity
-
Foundation Walls
-
Visual Inspection: Begin with a thorough visual inspection of the foundation walls. Look for any signs of deformation such as bulging, bowing, or leaning, which could indicate the walls are under stress or failing.
-
Crack Patterns: Pay attention to the patterns of any cracks present. Horizontal cracks can be particularly concerning as they may suggest lateral pressure from the soil outside. Vertical cracks might result from settling or drying shrinkage and can vary in seriousness. Diagonal or stair-step cracks in block or brick foundations can indicate differential settling, which might be a structural concern.
-
Water Leakage: Signs of water seepage through the foundation walls can also indicate structural issues, as water can erode or weaken the foundation material over time.
Floor Joists and Support Beams
-
Rot and Insect Damage: Inspect wooden components such as floor joists and support beams for signs of rot or insect damage. Soft spots, crumbling wood, or visible insect tunnels can compromise the structural integrity of the wood.
-
Undue Stress: Look for signs of undue stress, such as excessive sagging or bending in the joists or beams. This can indicate that the load above exceeds the designed capacity of the structure or that there has been a failure in another part of the support system.
-
Proper Alignment and Support: Ensure that all beams and joists are properly aligned and adequately supporting the floors above. Any signs of misalignment or inadequate support should be addressed immediately.
Posts and Footings
-
Secure Fastening: Check that support posts are securely fastened to the beams they support and that they rest solidly on the concrete footings. Any movement or instability in these connections can lead to structural issues.
-
Condition of Posts: Inspect the condition of the posts for signs of rot, corrosion (in the case of metal posts), or other damage. Even minor damage can reduce the load-bearing capacity of the posts.
-
Placement and Sizing of Footings: The concrete footings should be sized appropriately for the load they carry and placed at proper intervals to evenly distribute the structural load. Look for any signs of sinking or settling in the footings, which can indicate inadequate sizing or issues with the soil beneath.
-
-
Ventilation and Insulation
-
Airflow: Assess the basement’s ventilation system to ensure there is adequate airflow. Good ventilation is essential for removing humid air, which can contribute to moisture problems and poor indoor air quality. Look for mechanical ventilation systems like exhaust fans or air vents that facilitate the exchange of indoor and outdoor air.
-
Natural Ventilation: In basements with windows, check that they can be opened to allow for natural ventilation. Ensure that windows are not painted shut or obstructed, as operable windows can significantly improve air circulation.
-
Humidity Levels: Consider using a hygrometer to measure the humidity level in the basement. Ideal indoor humidity levels should be between 30% and 50% to prevent mold growth and ensure comfort. High humidity levels might indicate inadequate ventilation.
Insulation Quality
-
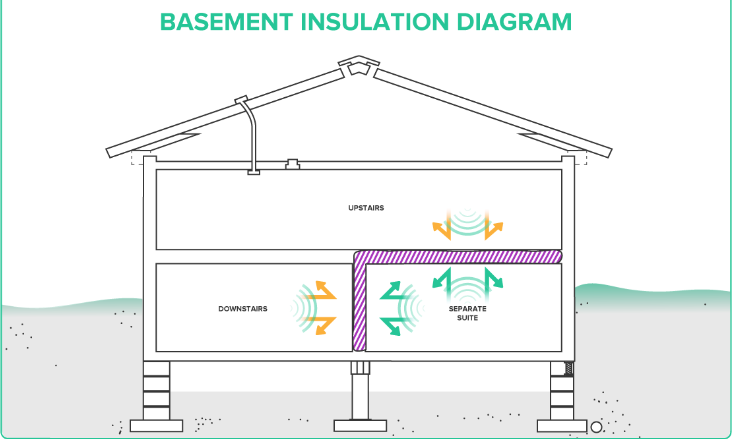
Insulation Material and Installation: Inspect the type and condition of the insulation used in the basement. Common materials include fiberglass batts, rigid foam boards, and spray foam. Insulation should be properly installed without gaps, compression, or damage, as these can reduce its effectiveness.
-
R-Values: Check that the insulation meets the recommended R-values for your climate zone. R-value measures the insulation’s ability to resist heat flow, with higher values indicating better insulation. Basements, being below ground, have specific insulation needs to prevent heat loss and manage moisture.
-
Insulation Coverage: Ensure that insulation covers all areas prone to heat loss, including walls, ceilings (if there is unheated space above), and around the rim joists. Incomplete insulation can lead to cold spots and higher energy costs.
Vapor Barriers
-
Presence and Condition: Look for a vapor barrier installed on the warm side of the insulation (towards the interior of the basement) to prevent moisture from passing through walls and floors. Vapor barriers are typically made of polyethylene plastic or a similar moisture-impervious material.
-
Seams and Joints: Check that the vapor barrier is properly sealed at seams and joints. Any gaps or tears in the vapor barrier can compromise its effectiveness by allowing moisture to penetrate the insulation.
-
Foundation Walls and Floors: Vapor barriers should also be considered for foundation walls and floors, especially if the basement is prone to dampness. A properly installed vapor barrier can help manage moisture levels and prevent water vapor from entering the basement space.
Addressing Ventilation and Insulation Issues
If issues with ventilation or insulation are identified, addressing them promptly can improve the basement’s comfort, energy efficiency, and air quality. This may involve adding or upgrading ventilation systems, installing new insulation to meet recommended R-values, or repairing or replacing damaged vapor barriers. For complex issues or to ensure compliance with local building codes, consulting with a professional contractor or energy auditor can provide expert guidance and solutions.
Egress
-
-
Egress Requirements: Familiarize yourself with local building codes regarding egress for basement living spaces. Codes typically require at least one egress window or door in each living area, specifying minimum sizes for width, height, and opening area to ensure occupants can escape in an emergency.
-
Accessible Exits: Check that egress windows or doors are easily accessible, with no obstructions that would prevent them from being used as an exit. Furniture and other items should not block access to these exits.
Egress Windows
-
Minimum Size: Confirm that egress windows meet the minimum size requirements as per local codes. This often includes a minimum width of 20 inches, a minimum height of 24 inches, and a minimum opening area of 5.7 square feet for ground-floor windows (requirements may vary by location).
-
Opening Mechanism: Inspect the mechanism used to open the window. It should be operable from the inside without the use of keys, tools, or special knowledge, ensuring a quick exit in case of an emergency.
-
Height from Floor: Ensure that the bottom of the egress window is not more than 44 inches from the basement floor, allowing easy access for most people.
Window Wells
-
Presence and Condition: If egress windows are below grade, window wells are required to provide access to the window and to allow light and air into the basement. Inspect window wells for proper installation and condition.
-
Size and Clearance: Check that window wells are large enough to allow the window to be fully opened and provide adequate space for a person to climb out. There should be at least 9 square feet of floor area, with a minimum horizontal projection and width of 36 inches.
-
Drainage: Inspect window wells for proper drainage. They should not accumulate water, which can lead to leaks into the basement and potentially block the egress in an emergency. Gravel or a drain tied into the home’s drainage system can help prevent water accumulation.
Maintenance and Upkeep
-
Regular Checks: Regularly inspect egress windows and doors for functionality. Ensure that they can be opened easily and that their pathways remain clear of obstructions both inside and outside.
-
Clear Pathways: Keep the area outside window wells clear of debris, snow, and vegetation to ensure unobstructed exit paths.
-
Common Issues with Basements
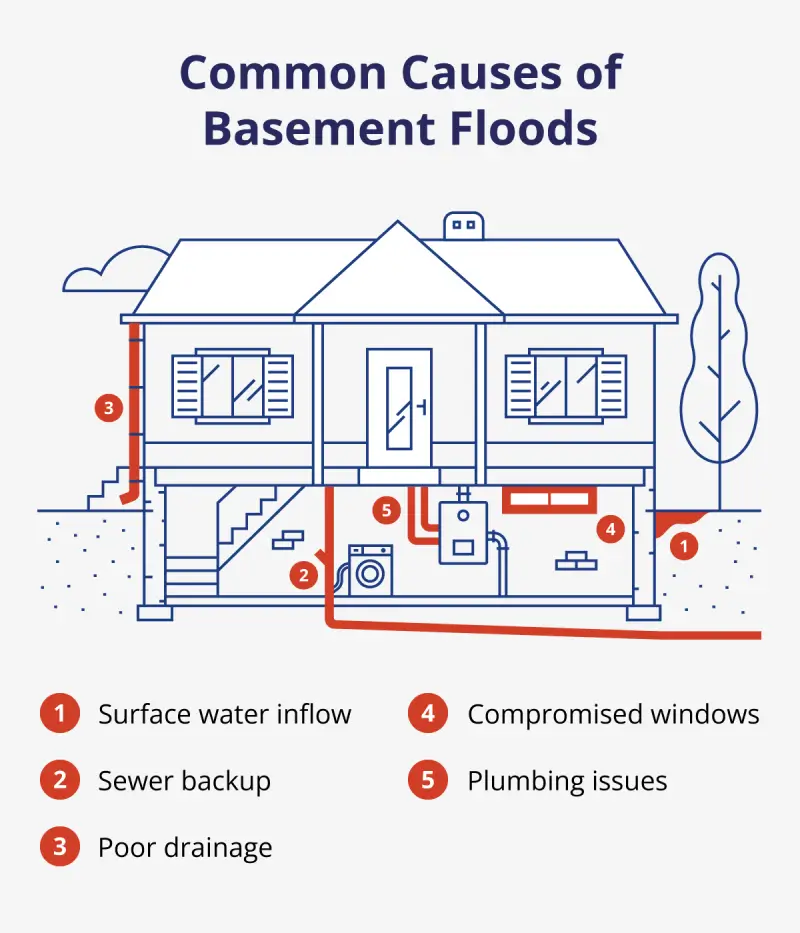
1. Water Intrusion
-
-
Sources: Water can enter basements through various pathways, including cracks in the foundation walls, the joint where the wall meets the floor, porous concrete, or windows. Groundwater swelling, poor exterior drainage, and heavy rainfall can exacerbate these issues.
-
Consequences: Persistent moisture can damage stored items, interior finishes, and can even compromise the structural integrity of the house. It also creates a conducive environment for mold and mildew growth.
Poor Ventilation
-
Issues: Inadequate ventilation in basements leads to stale, humid air, which can exacerbate moisture problems. Without proper air exchange, basements can become breeding grounds for mold and mildew, affecting indoor air quality and potentially leading to health issues.
-
Mitigation: Installing ventilation systems, such as exhaust fans or air exchange units, can improve air circulation. Dehumidifiers can also help reduce moisture levels.
Structural Damage
-
Signs: Visible signs of structural damage include foundation cracks (both horizontal and vertical), bowing or bulging walls, and sagging or uneven floors. These issues may result from hydrostatic pressure, soil settlement, or natural aging.
-
Implications: Structural damage can threaten the safety of the home, leading to significant repair costs. It’s crucial to address these issues promptly, often requiring the expertise of a structural engineer or specialized contractor.
Radon
-
Risk: Radon is a naturally occurring radioactive gas that can enter homes through cracks in the foundation, gaps around service pipes, or even through the concrete itself. It is the second leading cause of lung cancer after smoking.
-
Testing and Mitigation: Basements should be tested for radon levels, especially in areas known for high radon concentration. If high levels are detected, radon mitigation systems, such as soil suction radon reduction systems, can be installed to reduce indoor radon levels to safer values.
-
Maintenance and Problem Solving
-
Waterproofing: Implementing exterior and interior waterproofing measures can prevent water intrusion.
-
Dehumidifiers: Using a dehumidifier can help control moisture levels, reducing the risk of mold and improving air quality.
-
Structural Repairs: Address any structural issues promptly with the help of a professional engineer or foundation repair specialist.
-
Radon Mitigation: If high levels of radon are detected, installing a radon mitigation system can reduce levels to safer numbers.
-
Regular Inspections: Conduct periodic inspections to identify and address any emerging issues early.